
Learning how to isolate vocals from a fully mixed song can be a challenging task, as the vocals are usually blended with other elements such as instruments and effects.
However, there are a few techniques you can try to achieve some level of vocal isolation. Keep in mind that the success of these methods can vary depending on the song and mix quality. Here are a few approaches:
Using a Dedicated Vocal Isolation App
The easiest way to isolate vocals and instruments in an existing song is to use a tool that was designed to do this job. The app needs to have the technology to detect vocals and remove it from the song, so you can create a karaoke or backing track for your band.
A dedicated voice isolation app that fits this characteristic is the following:
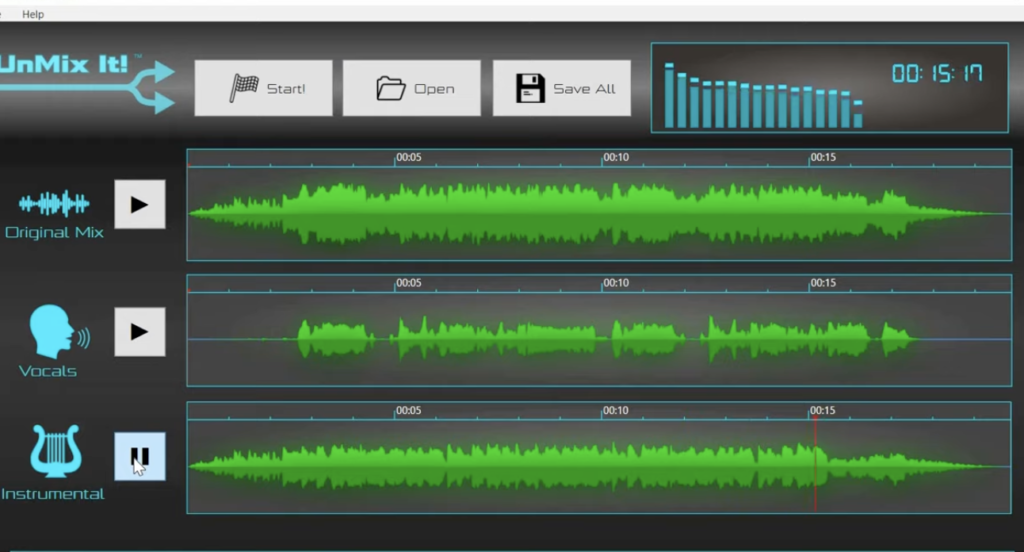
This app has the following features:
- Directly loads files for any song you want to process.
- Quickly separate vocals and instrumental parts for any song.
- Works on your local computer.
- Supports any computer running Windows.
Click Here Now to Get Voice Separator
How to isolate vocals from a song using EQ Filtering
Use an equalizer to target and reduce the frequencies that are prominent in the instruments and effects but less present in the vocals. This can help attenuate some of the competing elements and bring the vocals forward. Experiment with cutting frequencies in the instrumental ranges, such as lower midrange and high frequencies.
 To attempt isolating vocals from a song using EQ filtering, follow these steps:
- Import the Song: Open your digital audio workstation (DAW) or audio editing software and import the song you want to work with.
- Duplicate the Track: Create a duplicate track of the song. This will allow you to apply the EQ filtering without affecting the original track.
- Apply High-Pass and Low-Pass Filters: On the duplicated track, insert an EQ plugin or filter effect. Apply a high-pass filter to roll off the low frequencies below the vocal range. Start with a cutoff frequency around 100-200 Hz and adjust it to maintain the desired balance between vocals and other elements. Next, apply a low-pass filter to roll off the high frequencies above the vocal range, typically around 10-12 kHz. Again, adjust the cutoff frequency to find the right balance.
- Adjust the Q Factor: The Q factor determines the width of the frequency band affected by the filter. Experiment with a narrower Q to target specific frequencies that dominate the instruments, or use a broader Q to affect a wider range of frequencies. Find the setting that helps reduce instrument bleed while preserving the vocal presence.
- Fine-Tune with Midrange EQ: Vocals usually occupy the midrange frequencies, so use a parametric EQ to further shape the midrange. Boosting the vocal frequencies (around 1-4 kHz) and cutting any harsh or competing frequencies can help bring the vocals forward.
- Listen and Adjust: Continuously listen to the isolated vocal track alongside the original to assess the results. Make further adjustments to the EQ settings as needed to achieve the best possible balance between vocal isolation and overall audio quality.
 Keep in mind that complete vocal isolation is often challenging, especially in complex mixes where vocals are heavily blended with instruments and effects. The effectiveness of EQ filtering depends on the original mix, the quality of the recording, and the specific characteristics of the song.
Also Read:
10 Best Guitar Bridge Models on the Market
Epiphone Acoustic Guitar Models: Classic Sound with a Contemporary Twist
Jackson Guitars: The Perfect Weapon for Rock Players
Using Center-Channel Extraction
Many vocals are panned to the center of the stereo field. By using audio editing software or plugins that support center-channel extraction, you can try to isolate the vocal information that is typically present in the center, while reducing the stereo elements. This technique can be effective if the vocals are well-centered in the mix.
- Phase Cancellation: This method works best if you have access to the instrumental version or an exact replica of the song’s mix. By inverting the phase of the instrumental track and combining it with the original mix, you may cancel out certain elements, leaving the vocals more prominent. This technique requires careful alignment and matching of the tracks, and it may not yield perfect results.
- Vocal-Removal Software: There are software applications and plugins available that claim to isolate or remove vocals from songs. These tools use advanced algorithms to analyze and remove the vocals based on their spectral characteristics. While they can provide satisfactory results for some tracks, they may also introduce artifacts and affect the overall audio quality.
It’s important to note that none of these methods will give you perfect vocal isolation, especially for complex and well-mixed songs. The effectiveness of each technique depends on factors such as the mix quality, panning, effects, and the specific characteristics of the song. Experimentation and patience are key when attempting to isolate vocals, and it’s essential to manage expectations and understand that complete isolation may not be achievable in all cases.