The term “guitar action” refers to the distance between the strings of a guitar and the fretboard. It plays a crucial role in determining the playability, comfort, and overall performance of the instrument. Whether you’re a seasoned guitarist or a beginner, understanding guitar action is essential for achieving optimal playability and sound. In this article, we’ll delve into the concept of guitar action, its significance, and how to adjust it to suit your preferences.
What is Guitar Action?
 Guitar action is commonly defined as the height of the strings above the frets on the fretboard. It is measured at various points along the neck, typically at the 1st fret and 12th fret. The distance between the strings and the frets affects how easy or challenging it is to press down on the strings and produce clear, clean sounds.
Significance of Guitar Action
- Playability:
- Properly adjusted guitar action contributes to ease of playability. Players often prefer a comfortable action that allows for smooth and effortless fretting of notes and chords.
- Tone and Intonation:
- The action influences the tone and intonation of the guitar. An action that is too high may result in increased string tension, affecting the guitar’s ability to produce a clear and resonant sound. Conversely, an action that is too low might lead to buzzing or fretting out issues.
- Technique:
- Guitarists use various techniques, such as bending and vibrato. The action affects how these techniques feel and sound. A well-adjusted action accommodates different playing styles and techniques.
- String Sustain:
- The action also impacts the sustain of the guitar. A balanced action allows strings to vibrate freely, contributing to sustained notes and chords.
Also Read:
LyxPro 39” SB Series Electric Guitar Review
How to change acoustic guitar strings?
MXR Clone Looper Guitar Effects Pedal: Review
 Adjusting Guitar Action
Adjusting guitar action involves making changes to the height of the strings above the frets. This can be done by modifying the truss rod, saddle height, and nut height. Here are the key components to consider when adjusting guitar action:
- Truss Rod:
- The truss rod is a metal rod inside the neck of the guitar that helps counteract the tension exerted by the strings. Adjusting the truss rod can influence the neck’s curvature and, consequently, the action. Clockwise turns typically increase relief (concave bow), while counterclockwise turns decrease relief.
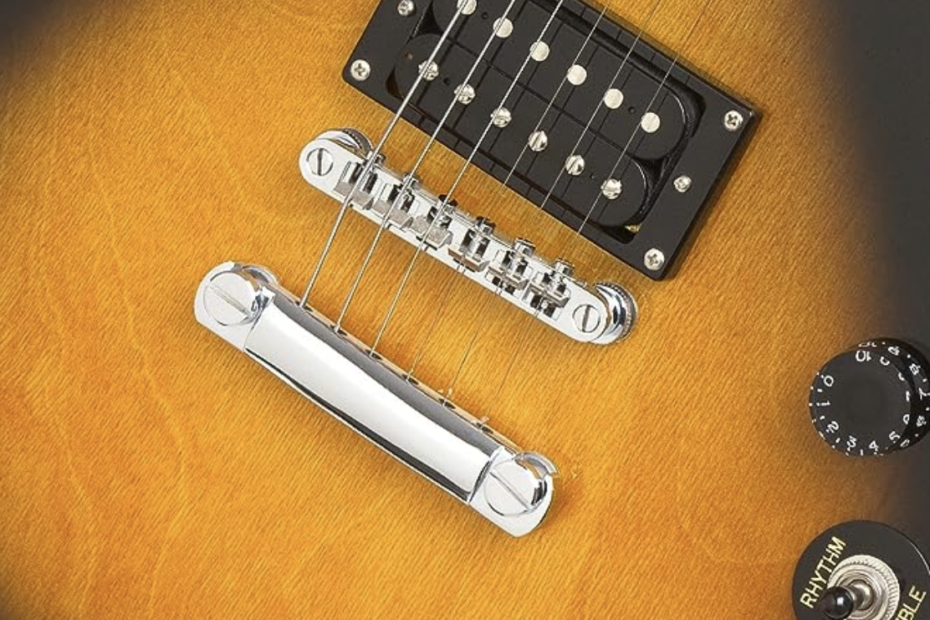
- Saddle Height:
- The saddle is located on the bridge of the guitar. Raising or lowering the saddle adjusts the action. A higher saddle increases the action, while a lower saddle decreases it.
- Nut Height:
- The nut is located at the top end of the fretboard. Adjusting the nut height involves modifying the slots to ensure proper clearance for the strings. This impacts the action at the 1st fret.
Tips for Adjusting Guitar Action
- Check Neck Relief:
- Before adjusting the action, ensure the neck has the correct amount of relief. Excessive or insufficient neck relief can affect the action.
- Make Gradual Adjustments:
- When making adjustments, do so gradually. Small changes can have a significant impact, so it’s essential to make adjustments slowly and assess the results.
- Consider String Gauge:
- The gauge of your guitar strings can influence the action. Lighter gauge strings generally exert less tension, allowing for lower action.
- Seek Professional Help:
- If you’re unsure about adjusting the action, consider seeking assistance from a professional guitar technician. They can provide expert advice and ensure adjustments are made correctly.
 How to Improve Guitar Action
Improving guitar action involves adjusting the height of the strings above the frets to achieve optimal playability and sound. Here are step-by-step instructions on how to improve guitar action:
Assess the Current Action
- Before making any adjustments, evaluate the current action of your guitar. Identify areas where the action may be too high or too low, and listen for any buzzing or fretting out issues.
Check Neck Relief
- Ensure that the neck has the correct amount of relief. Use the guitar’s truss rod to adjust the neck curvature. Clockwise turns typically increase relief (concave bow), while counterclockwise turns decrease relief.
Measure Action at 1st Fret and 12th Fret
- Use a feeler gauge or ruler to measure the distance between the strings and the frets at the 1st fret and 12th fret. This will give you a baseline measurement for your guitar’s current action.
Adjust Truss Rod
- If needed, make truss rod adjustments to fine-tune the neck relief. Make small adjustments and check the relief frequently. Allow the wood to settle before making further adjustments.
Check Saddle Height
- Examine the saddle on the bridge. Raising or lowering the saddle will affect the action. A higher saddle increases the action, while a lower saddle decreases it. Adjust the saddle height as needed.
Check Nut Height
- Evaluate the nut height at the 1st fret. Adjust the nut slots to ensure proper clearance for the strings. Nut files or sandpaper can be used for this purpose. Be cautious to avoid removing too much material.
Consider String Gauge
- The gauge of your guitar strings can influence the action. Lighter gauge strings generally exert less tension, allowing for lower action. Experiment with different string gauges to find the balance that suits your preferences.
Make Gradual Adjustments
- Whether adjusting the truss rod, saddle, or nut, make changes gradually. Small adjustments can have a significant impact, so take your time and assess the results after each adjustment.
Check for Buzzing
- Play each string and fret across the fretboard to check for buzzing or fretting out. If you encounter buzzing, reassess the action and make further adjustments as needed.
Seek Professional Assistance
- If you’re unsure about making adjustments or encounter difficulties, consider seeking help from a professional guitar technician. They can provide expert guidance and ensure that adjustments are made accurately.
Play and Evaluate
- After making adjustments, spend some time playing the guitar to evaluate the feel and sound. Ensure that the action is comfortable for your playing style and that the guitar produces clear and resonant tones.
Conclusion
Understanding and adjusting guitar action is a valuable skill for any guitarist. Achieving the right balance ensures a comfortable playing experience and enhances the overall sound and performance of the instrument. Experiment with different action settings to find the configuration that suits your playing style and preferences.
Whether you’re aiming for low action for fast fingerpicking or slightly higher action for slide playing, the key is to strike a balance that optimizes playability and tone.